
2024 Total Solar Eclipse: Get Ready Now!
2024 Total Solar Eclipse
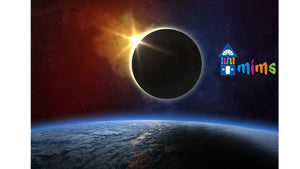
You hear that, world? The big day is fast approaching, so rustle up some solar eclipse glasses, familiarize yourselves with the moon’s phases, and look up the name of any town that might be in the path of totality.
That’s right; the total eclipse is coming to North America on April 8, 2024.
Now, you may be thinking to yourselves that an eclipse of the sun is not worth a road trip, but you may change your mind when you hear about what a great opportunity this affords.
First, this will be the last total solar eclipse visible from the United States until 2044. You’ll have to wait twenty whole years before this rare opportunity offers itself again. Second, the path of the eclipse cuts straight through America, making it easier than ever before to find the perfect place to observe the full eclipse. You couldn’t ask for a better view! Finally, there is no better way to teach kids about the phases of the moon as it passes in front of the sun. SEE the path of totality in the map below.

Phases of the Total Eclipse
It all starts with the “first contact.” That simply means that the moon has begun its path across the sun. As the full moon slowly but surely moves to block the light of the sun, a dark crescent shape starts to form. The “crescent” grows and grows until there is barely any light left.
Dark bands of shadows separated by white spaces start to move rapidly down the sides of buildings and along the ground. These “shadow bands” are caused by turbulent wind cells in the upper atmosphere that distort sharp-edged light rays. The bands are active for only a moment and are hard to photograph, but they serve as a signal that totality is quickly approaching.
The next stage is even more fleeting than the last. For an almost imperceptible moment, when the last of the sun’s rays are shining through the moon’s crevices and valleys, small beads of light are visible on the moon’s edge. These little “beads”, called Bailey’s Beads, are quickly replaced by the next phase.
The last phase before the big event is called the diamond ring effect. This is the last time that the sun’s rays are visible before the moon’s shadow completely covers the sun. What happens is the sun’s rays that are still shining around the moon concentrate in one spot and gleam like a diamond. Around the moon, a soft glow appears as the sun’s outer atmosphere becomes visible. This is called the corona, and it forms a ring around the moon. Together with the last glowing sun rays, it gives the impression of a diamond ring.
Now comes the moment that everyone is there to see: TOTALITY. Totality, also known as second contact, is when the shadow of the moon completely blocks out the sun. Totality is only visible from the narrow path along which the moon’s shadow falls—the path of totality. Viewers outside the path will only be able to see a partial solar eclipse. But those within the path are awarded a special treat. For the few minutes during totality, viewers can safely remove their protective eyewear. While their glasses are off, they can take a quick look at the wonders going on around them. With the sun’s light blocked, the night sky offers a brighter view of the solar system. Stars and even planets shine brilliantly overhead. Around the moon, the corona and chromosphere (a faint pink glow caused by the solar atmosphere) tinge the sky.
TOTALITY.
Down on earth, temperatures drop,
a 360 degree sunset can be visible,
and the world goes eerily silent.
After a few minutes elapse, the eclipse viewers must put their solar glasses back on. The second the sun’s rays are visible again, it is no longer safe to view with the naked eye. This moment, when the sun’s rays peep through on the opposite side of the moon, is called third contact. The phases then repeat themselves in reverse order: the diamond ring effect, Bailey’s Beads, and shadow bands. The second the moon’s shadow is past the sun, fourth contact is achieved and the eclipse is over.
Safety
Special Glasses. As you may already know, it is a terrible idea to stare into the sun. The sun’s powerful UV rays are incredibly harmful to the human eye when viewed without the proper protection. Clearly, it’s a good idea to wear eye protection, but keep in mind that a normal pair of sunglasses won’t cut it. In order to look at the sun safely, you need to wear special glasses that are rated for the eclipse. Normal sunglasses are inadequate and wearing them will result in eye damage.
Pinhole Projector. Another safe way to view an eclipse is with the help of a pinhole projector. This is simply a piece of paper, cardboard, etc. with a small hole punched in it that projects an image of the sun onto a nearby, flat surface. The hole will not protect your sensitive eyes from the sun, so do NOT use it to look directly at the eclipse. Instead, use it to watch the moon’s shadow pass overhead indirectly.
Solar Filter on Cameras. Lastly, don’t view or photograph the eclipse through a telescope, binoculars, camera lens, etc. without first installing a proper solar filter. The lenses will concentrate the sun’s light and greatly increase the damage it can inflict. In a similar way, don’t look through a lens while wearing eclipse glasses; the concentrated sun rays will melt and damage the solar filter in the glasses.
Resources and Activities

CLICK TO WATCH THE FLIP BOOK IN ACTION.
FOR ALL GRADES
Learn about safety while watching a solar eclipse at SolarEclipseBooks.com
FIRST GRADE SOLAR ECLIPSE ACTIVITIES
1. Act it out.
Need: flashlight, a piece of paper, crayons, scissors
All you need to do for this fun activity is have the kids cut their paper in a circle, about the same size as the head of your flashlight. The children can then spend some time decorating their circles to make them look like the moon. Once the decorating is complete, dim the lights, point the flashlight at a smooth surface, and let the kids take turns passing their moons in front of the flashlight. Point out how the moons cast a shadow over the light and have the kids take note of it.
2. Make sun prints.
Need: wild flowers/ leaves/ plants, construction paper, tape
Take the children outside and have them gather different foliage (flowers, leaves, plants, etc.). Next, have each kid tape their finds to pieces of construction paper. Leave the papers outside in the sunlight for a few hours, then remove the plants. The sun will have bleached the paper, leaving an outline of whatever was taped on it. Use this as an illustration for teaching the children just how powerful the sun’s light is. Remind them to never stare at the sun!
3. Make a solar eclipse flip book to watch an eclipse.
Need: download FLIP BOOK pdf, stapler, scissors
Print out the pages, cut out, staple them together, and have the kids flip through the book.

SECOND GRADE SOLAR ECLIPSE ACTIVITIES
1. Pop a balloon.
Need: a balloon, a magnifying glass, sunglasses, a sunny day
If the sun is shining brightly, then this is a fun project to do. Have each kid blow up a balloon and take them outside. Once there, have the children take turns using the magnifying glass to focus the sun’s rays on their balloons and pop them. Make sure that the kid currently taking their turn is wearing sunglasses since the concentrated sun ray will be quite bright. Use this as an opportunity to teach the kids about the power of the sun’s rays, and caution the children to never stare at the sun!
2. Act it out.
Need: yellow and white construction paper, popsicle sticks, tape, crayons, scissors
Have the children cut the yellow and white papers into similarly sized disks. Let the kids decorate the two disks to look like the sun and the moon. Tape popsicle sticks to the back of the disks. The kids can then act out the eclipse, passing the moon in front of the sun.
3. Make a solar eclipse flip book to watch an eclipse.
Need: download FLIP BOOK pdf, stapler, scissors
Print out the pages, cut out, staple them together, and have the kids flip through the book.
THIRD GRADE SOLAR ECLIPSE ACTIVITIES
1. Make a simple pinhole viewer.
Need: cardboard, a piece of foil, tape, a pushpin, markers, scissors
Let the kids cut the cardboard into square frames and decorate them. Next, have the children cut the foil into a similarly sized square and tape it to the back of the frame. Lastly, use the pushpin to make a small hole in the middle of the foil. Once the eclipse starts, the children can use their pinhole viewers to cast a shadow on a flat surface and view the eclipse indirectly.
2. Make an edible eclipse demonstration.
Need: Oreos
Have the children carefully separate the halves of their Oreos so that all the white filling is on one cookie. Tell the kids to take small bites of the half with the cream on it as you explain the different phases of the eclipse. Have the children look at their cookies after each bite and make a note of how much of the cream is still visible.
3. Make a solar eclipse flip book to watch an eclipse.
Need: download FLIP BOOK pdf, stapler, scissors
Print out the pages, cut out, staple them together, and have the kids flip through the book.
FOURTH GRADE SOLAR ECLIPSE ACTIVITIES
1. Diagram the different eclipse types.
Need: paper, colored pencils
After teaching the kids about the differences between a total solar eclipse, partial solar eclipse, annular solar eclipse, and total lunar eclipse, have them draw a sketch of each one. Make sure they leave a space besides each sketch. In that space, have them write a few short facts about each eclipse.
2. Make a complex pinhole viewer.
Need: a thin piece of cardboard (like a cereal box), a pushpin
Have the kids cut the cardboard into a circle. Let them use the pushpin to create a design of little holes all over the cardboard. Once the eclipse starts, the children can use their pinhole viewers to cast a shadow on a flat surface to view the eclipse indirectly.
3. Make a solar eclipse flip book to watch an eclipse
Need: download FLIP BOOK pdf, stapler, scissors
Print out the pages, cut out, staple them together, and have the kids flip through the book.
FIFTH GRADE SOLAR ECLIPSE ACTIVITIES
1. Make a moon journal.
Need: a notebook, a pencil
On the first day of the month, give each kid a notebook. Every night for the entire month, have the kids go outside, make a sketch of the moon, and write about their observations.
2. Write an eclipse poem.
Need: a piece of paper, a pencil
After you explain the stages of an eclipse, have the children write poems or short stories that creatively illustrate/ explain the stages.
3.
Make a solar eclipse flip book to watch an eclipse
Need: download FLIP BOOK pdf, stapler, scissors
Print out the pages, cut out, staple them together, and have the kids flip through the book.
Another Great Resource
Eclipse

Set in 1919, this book tells the true story of British astrophysicist Sir Arthur Stanley Eddington as he set out to photograph and study a solar eclipse.
Four years before, German scientist Albert Einstein had developed his famous theory of relativity. He said that the sun’s incredible gravity could bend light. Scientists of that time believed that light always traveled in a straight line, so many found Einstein’s theory hard to believe.
In order to test Einstein’s theory, Eddington decided they needed to photograph the stars before and during an eclipse to measure if their light was actually bent by the sun. The act of taking photos back then was a more time-consuming process than it is now. They had to be quick, accurate, and incredibly lucky to pull this off.
But most importantly, they needed a clear sky.
You can imagine their horror when they awoke the morning of the eclipse to discover overcast skies and an incoming rain storm. Would it be clear in time?
CLICK HERE FOR MORE INFORMATION ABOUT ECLIPSE


1 comment
Thank you very much for the ideas! The printable is easy to upload & print- no problem. Happy Eclipse Day! #eclipseinthe603